Search 
 
  • When Applying Decals With The Wet Method, What Is The Best Way
    We Highly Recommend Application Fluid Instead Of Just Soapy Water, For Less Air Bubbles And Better Adhesion. First You Will Want To Get A Spray Bottle And Add 1-2 Drops Of Dish Soap and Mix Well, Use This To Spray On The Decals And The Surface You Are Apply Them To, On Smaller Decals You May Want To Remove The Backing Liner And Pre-mask From Decal And Then Install Wet. As If The Mask Gets Wet Is Is Harder To Remove, Be Sure To Tape Decals In Place In The Center, Pull Decal Away From Rear Liner, Spray Water Solution On The Back Of The Decal Sticky Side,Then Squeegee Decal In Place And Allow To Dry Before Removing Pre-Mask


How To Apply A Small Sticker or Decal

Step 1

Clean the area thoroughly with rubbing alcohol or soap and water. Do not use Windex or similar products because it will leave a residue behind that will prevent the sticker from adhering well.

Step 2

Prepare the sticker for application by firmly rubbing a squeegee or credit card across the clear transfer tape. This removes any air bubbles that may have formed and makes the sticker cling to the transfer tape.

Step 3

Peel the white paper backing off the sticker. If the sticker clings to the backing, slowly replace the paper backing and repeat Step 2.

Step 4

Slowly lower the sticker onto the surface and rub it in place firmly with a squeegee or credit card. For best results, wait 24 hours before moving to the next step.

Step 5

Slowly peel the clear transfer tape off at an angle. Be careful not to pull the sticker off the surface. If sticker pulls away from the surface repeat Step 4.

 
VINYL STRIPES INSTALLATION PHOTO'S & VIDEO
 WE DO NOT RECOMMEND HAVING YOUR DEALERSHIP, WINDOW TINTERS OR BODY SHOPS
INSTALL YOUR STRIPES UNLESS THEY HAVE A STRIPPING EXPERT
THAT INSTALLS STRIPES EVERYDAY,
DO IT YOURSELF OR FIND A SIGN SHOP OR GRAPHICS SHOP
OUR SETS ARE DESIGNED FOR THE DO-IT-YOUR-SELFERS 

How To Deal With Bubbles And Wrinkles When Installing Vinyl Graphics

http://www.signindustry.com/installation/articles/2004-04-15-JL-AvoidingBubblesVinylApplication.php3

MUSTANG HOCKEY STICK STYLE SIDE STRIPES INSTALLATION PHOTO'S
MUSTANG ROCKER PANEL STRIPES INSTALLATION PHOTO'S
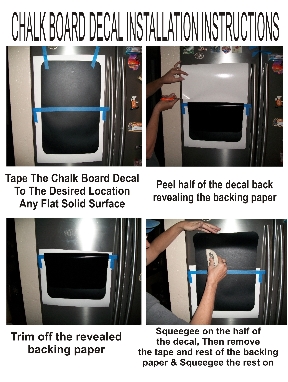
For All Other Applications, Dry Install

How To Apply A Small Sticker or Decal

Step 1

Clean the area thoroughly with rubbing alcohol or soap and water. Do not use Windex or similar products because it will leave a residue behind that will prevent the sticker from adhering well.

Step 2

Prepare the sticker for application by firmly rubbing a squeegee or credit card across the clear transfer tape. This removes any air bubbles that may have formed and makes the sticker cling to the transfer tape.

Step 3

Peel the white paper backing off the sticker. If the sticker clings to the backing, slowly replace the paper backing and repeat Step 2.

Step 4

Slowly lower the sticker onto the surface and rub it in place firmly with a squeegee or credit card. For best results, wait 24 hours before moving to the next step.

Step 5

Slowly peel the clear transfer tape off at an angle. Be careful not to pull the sticker off the surface. If sticker pulls away from the surface repeat Step 4.


*Use a pin to poke any air bubbles in the center and push the air out through the hole.
*For best results do not apply a sticker in extreme hot or cold temperatures.

Knife Tape Installation Video

 Challenger R/T Fender Hash Stripes Installation Pictures
 Dodge Challenger RT Side Stripes In FLX Paint Stripes